
You’re enjoying the last warm days of a Claymont summer when a brief, intense thunderstorm rolls through. An hour later, you notice a faint, brownish watermark on the ceiling in your upstairs hallway, right near a light fixture. It’s small, almost unnoticeable, but it’s new. Or perhaps you’re doing some late-season yard work and, looking up at your home, you spot a streak of rust running down from the base of your chimney. These seemingly minor issues are often the first whispers of a much larger problem: roof flashing failure.
As a Senior Roofing Specialist with over a decade of hands-on experience in this area, I’ve seen how small flashing problems in August can turn into major leaks by October. Flashing is the metal or composite material installed at every joint, valley, and penetration on your roof - around chimneys, vent pipes, skylights, and where a roof meets a wall. It’s the critical component that directs water away from these vulnerable areas. Here in Claymont, the late-summer cycle of hot, sunny days followed by cooler nights and sudden downpours puts immense stress on these materials. This is the ideal time to identify and address these subtle signs before the heavier, prolonged fall rains arrive.
Common Signs and Symptoms
From the ground or through a careful attic inspection, you can often spot the early signs roof flashing is failing. Our trained technicians have a systematic process for identifying these issues during an inspection, but here are seven key indicators you can look for yourself.
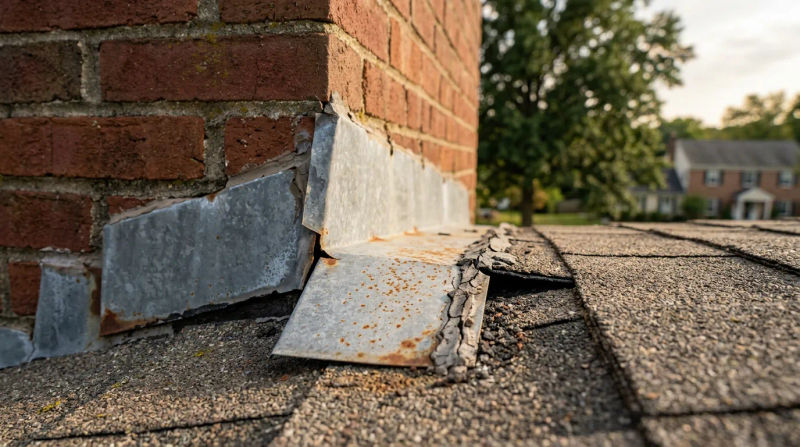
- 1. Visible Rust or Corrosion: Most flashing is made from galvanized steel or aluminum. If you see rust stains on the flashing itself or streaks running down your shingles or siding, it means the protective coating has worn away. The metal is now exposed to the elements and is actively deteriorating, making it brittle and prone to developing pinhole leaks.
- 2. Cracked or Dried-Out Sealant: Look closely at the edges of the flashing, especially around penetrations. You’ll often see a bead of roofing cement or caulk used as a secondary seal. Over time, intense sun and temperature fluctuations cause this sealant to dry out, shrink, and crack, creating a direct path for water intrusion. This is a very common cause of a roof leak around vent pipe flashing.
- 3. Gaps and Separation: Flashing should lie flat and tight against the roof and the object it’s protecting. If you see pieces that are lifting, bent, or pulling away from a chimney or wall, it’s a major red flag. This is particularly important for step flashing gaps before fall rains become a problem. Step flashing consists of interwoven L-shaped pieces layered with shingles along a roof-to-wall transition, and even a small gap can funnel a surprising amount of water behind your siding.
- 4. Interior Water Stains or Peeling Paint: That watermark on your ceiling is the most obvious sign that water has already breached your roof. Check ceilings and walls directly below skylights, chimneys, vents, and attic dormers. Peeling paint, bubbling drywall, or damp spots in the attic are definitive evidence of a leak that needs immediate attention.
- 5. Damaged Shingles Around Flashing: If the shingles immediately touching the flashing are cracked, loose, or missing altogether, it can be a symptom of a flashing problem. Failed flashing allows water to get underneath the shingles, causing the fasteners to rust and the shingles themselves to lift and become vulnerable to wind.
- 6. Dents, Punctures, or Physical Damage: Severe weather, falling tree limbs, or even careless foot traffic from another contractor can dent or puncture flashing. While a small dent might seem cosmetic, it can disrupt the flow of water, creating a small dam that allows water to pool and eventually find a way in.
- 7. Loose or Dislodged Flashing Pieces: In high winds or due to fastener failure, a piece of flashing can become completely dislodged. This is an emergency situation. A missing piece of counter-flashing on a chimney or a section of step flashing exposes the raw roof deck and underlayment to direct rainfall.
What Causes This Problem
Understanding the root cause of roof flashing failure helps in appreciating why professional repair is so critical. It’s rarely just one thing, but a combination of factors.
First, there’s age and material breakdown. Nothing lasts forever. Sealants have a lifespan of only a few years, while even galvanized steel will eventually succumb to rust once its protective zinc coating weathers away. Expansion and contraction from Delaware’s hot summers and cold winters accelerate this process, fatiguing the metal and breaking down seals.
Second, and perhaps the most common cause our crews encounter, is improper installation. Flashing is a craft that requires precision. Using the wrong type of flashing for an application, cutting corners by relying on sealants instead of proper mechanical overlaps, or failing to integrate it correctly with the shingles and underlayment will lead to premature failure. This is especially true for the complex, intersecting rooflines found on many of the beautiful pre-1940s Craftsman and Tudor Revival homes in nearby Arden. These historic properties require a deep understanding of traditional roofing and flashing techniques.
Finally, building movement and settling play a role. As a house settles over the decades, it can create stress points that pull flashing away from chimneys and walls, breaking the watertight seal. This is a slow, gradual process that often goes unnoticed until a leak appears.
When to Call a Professional
Some homeowners are comfortable performing a visual inspection from the ground with a pair of binoculars, which is a safe and effective way to spot obvious issues like rust or a dislodged piece. You can also safely check your attic for signs of water intrusion. However, when it comes to diagnosis and repair, this is a job for experienced professionals.
Walking on a roof is inherently dangerous, and without proper training and safety equipment, it’s a risk not worth taking. Furthermore, our technicians are trained to spot the subtle clues an amateur might miss. What looks like a simple sealant crack could be a symptom of a much larger installation error hidden beneath the shingles.
A common mistake we see is a well-intentioned but incorrect DIY repair. Simply applying a thick layer of roofing cement over a gap might stop a leak temporarily, but it often traps moisture, accelerates rot, and makes a proper, long-term repair more difficult and costly later on. A qualified professional will not just patch the symptom; they will identify the root cause - be it an installation flaw or material failure - and implement a durable, correct solution. Our workflows are designed to systematically diagnose the problem and ensure the repair integrates seamlessly with your existing roofing system.
Conclusion
Your roof’s flashing is its first and most important line of defense against water intrusion at its most vulnerable points. The late-summer season in Claymont provides a critical window to identify and address potential failures before they are exposed by autumn’s weather. Look for the key signs: rust, cracked sealant, visible gaps, and interior water stains.
Remember that flashing problems don’t fix themselves; they only get worse. Acting early can be the difference between a minor, affordable repair and a major project involving structural rot and interior restoration. Don’t wait for a small drip to become a downpour.
If you notice any of these signs, contact a local roofing professional for an inspection. An expert assessment can provide peace of mind and protect your home for years to come.